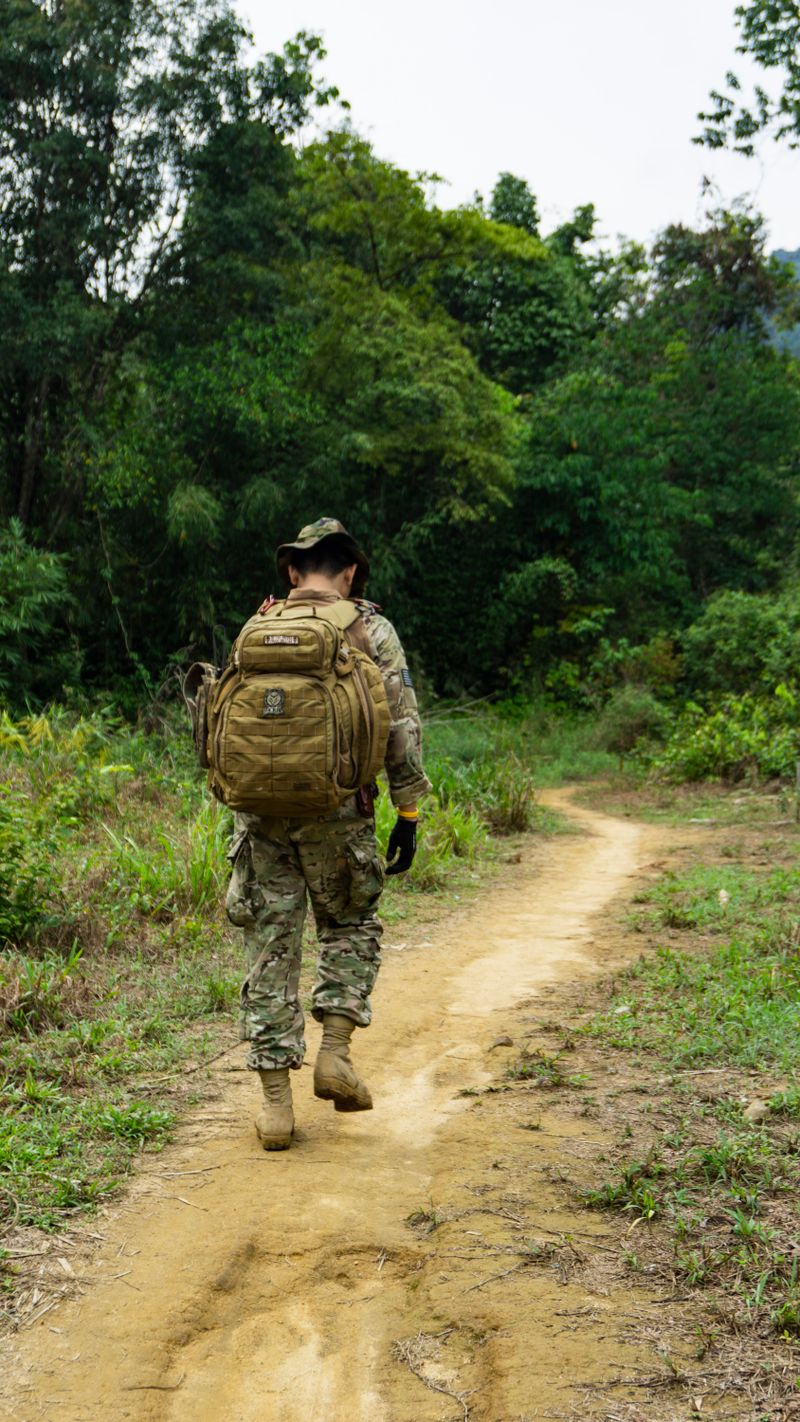
Rucking is the practice of walking with a loaded backpack. That’s the entire concept. No heart rate monitor required. No specific shoes. No gym. You put weight in a bag, put the bag on your back, and walk.
It sounds simple because it is. It also works unusually well, which is why it’s been the standard military physical training method for generations and why it’s become one of the more popular low-tech training approaches in the last decade.
Here’s what the research says, how to start, how to progress, and how to solve the shoulder and back problems that cause most beginners to quit.
Why Rucking Works#
Walking is low-intensity aerobic work. Adding load changes the equation significantly.
A 2018 study published in Applied Physiology, Nutrition, and Metabolism found that load carriage at modest intensities (30 percent of bodyweight) significantly increased both metabolic demand and muscle activation in the lower body compared to unloaded walking at the same pace. You’re not running, but your body is working at a level much closer to running than the pace suggests.
The specific benefits:
Cardiovascular conditioning without joint impact. Running creates ground reaction forces of 2 to 3 times your bodyweight with each footstrike. Walking with load stays close to 1 to 1.5 times bodyweight. For people with knee, hip, or ankle issues that make running uncomfortable, rucking is often the best alternative that still builds meaningful aerobic capacity.
Posterior chain strength. Carrying load upright activates your glutes, hamstrings, spinal erectors, and traps continuously throughout the session. It’s not a replacement for squats or deadlifts, but it builds durability in the muscles that keep you upright in a way that unloaded walking doesn’t.
Mental durability. This is harder to quantify but genuinely real. Sustained effort under load, especially in poor weather or on hilly terrain, builds tolerance for discomfort that transfers to other training and to daily life. It’s a feature, not a side effect.
What You Need#
A backpack you already own. Any pack with padded shoulder straps works for starting out. Internal frame packs designed for hiking carry load better than school-style daypacks, but either works at low weights. If your bag has a sternum strap (the horizontal strap across your chest), use it; it distributes shoulder load significantly.
Something heavy. The traditional choice is a weight plate wrapped in a towel, placed at the back of the pack against your spine. Books, water jugs (a full 1-gallon jug weighs 8.3 pounds), sandbags, canned goods in a stuff sack: anything dense that won’t shift around works. Pack it high in the bag and tight against your back. Weight hanging low or away from your body increases leverage on your spine and creates the back pain that turns people off rucking.
Footwear with support. Running shoes work. Trail runners are better. Dedicated hiking boots are better still for rough terrain. The main requirement is that your heel is supported and your ankle doesn’t wobble laterally under load.
That’s it. A pair of shoes and a bag with something heavy in it. Total cost can be zero if you already own a backpack.
How Much Weight to Start#
The most common beginner mistake is starting too heavy. Your cardiovascular system adapts faster than your connective tissue: tendons, ligaments, and the structures in your shoulders, hips, and back that bear load with every step. Starting at a pace that feels easy reduces the risk of the overuse injuries that are almost entirely the result of adding too much too fast.
Starting weight: 10 percent of your bodyweight, rounded down. For a 180-pound person, that’s 18 pounds, rounded to 15 or 20 depending on what you have available. For a 150-pound person, start around 10 to 15 pounds.
Starting distance: 2 miles at a comfortable walking pace. This takes most people 35 to 45 minutes. It should feel like a moderate-effort walk: not a stroll, but not a struggle.
Do not exceed this recommendation your first week regardless of how fit you are. Your tendons don’t care how good your cardio is.
The 6-Week Progression#
| Week | Weight | Distance | Target Pace |
|---|---|---|---|
| 1 | 10% bodyweight | 2 miles | Comfortable |
| 2 | 10% bodyweight | 2.5 miles | Comfortable |
| 3 | 12–15% bodyweight | 2.5 miles | Moderate effort |
| 4 | 12–15% bodyweight | 3 miles | Moderate effort |
| 5 | 15–20% bodyweight | 3 miles | Brisk |
| 6 | 15–20% bodyweight | 4 miles | Brisk |
3 sessions per week, non-consecutive days.
After week 6, you have a solid base. From there, the variables to progress are weight, distance, pace, and terrain (hills multiply difficulty significantly). Most people find a sweet spot around 20 to 30 percent of bodyweight for ongoing training.
Military standards (for context, not prescription) typically involve 35 to 45 percent of bodyweight at 3.5 to 4 mph over long distances. That’s the advanced end. Get the first 6 weeks in before thinking about that.
Solving Shoulder Hotspots#
Shoulder hotspots, the burning, chafing, or aching that develops on the top of your shoulders and at the base of your neck, are the most common reason beginners stop rucking. They’re almost always caused by one of four things.
1. Pack fit: The shoulder straps sit wrong for your torso length. If the pack sits too low, the straps pull away from your body at the top, concentrating pressure at a single point. Fix: adjust the load lifter straps (the short straps connecting the shoulder straps to the top of the frame) so they form a roughly 45-degree angle. This pulls the load into your back and distributes it across more of the strap surface.
2. Weight too far from your back: Load packed loosely or toward the bottom of the bag creates leverage. Even 20 pounds hanging 4 inches off your back feels heavier and more awkward than 25 pounds tight against your spine. Fix: pack dense items high and against the back panel. Lighter, softer items go in front and at the bottom.
3. No sternum strap: Without a sternum strap, shoulder straps migrate outward over time, focusing pressure at the outside edge of the shoulder rather than distributing it across the trapezius. Fix: use the sternum strap. It should be snug but not compressing your chest; you should be able to breathe fully.
4. Starting too heavy before your shoulders adapt: Straps create compressive load on the trapezius regardless of fit. This causes soreness in unacclimated tissue. Fix: follow the progression above. If your shoulders are sore after week 1, reduce the weight, not the distance.
If hotspots persist: Add thin padding under the straps. A folded bandana or a section of sleeping pad foam under each strap changes the pressure distribution enough to make a meaningful difference. Dedicated ruck sack pad sleeves cost $10 to $15 and are worth it if you ruck regularly.
Adding Hills#
Hills change the training stimulus significantly. A 15-pound ruck on a 6 percent grade generates roughly the same metabolic demand as a 25-pound ruck on flat ground. Use them as a progression tool rather than adding weight when you want to increase intensity.
Hill rucking also taxes the calves and anterior tibialis (the muscle along your shin) more than flat terrain. These can fatigue and ache if you add hills too quickly. Introduce one hilly route per week before making it your standard.
Where to Ruck#
Anywhere you walk. Parks, neighborhoods, trails, treadmills (set incline to 1 to 2 percent for better flat-ground simulation). Early morning before most people are out is the most peaceful option and also when air temperature is lowest in summer.
Trails and variable terrain are better training than flat pavement: more muscle activation, more proprioceptive challenge, and lower repetitive impact on any single joint. If you have access to hills or trails, use them.
The Cost Math#
You likely already own everything you need. If you don’t have a suitable pack, a basic hiking daypack runs $25 to $40 new and $5 to $15 used. If you want to add dedicated ruck weight, a 30-pound weight plate costs about $30 at most sporting goods stores.
Ceiling cost to start: $55. Realistic cost if you own a backpack: $0.
Do this today: Load your current backpack with 10 to 15 percent of your bodyweight using whatever you have: books, water jugs, a bag of rice. Walk two miles. That’s your first session. Adjust from there.